Over The Wire - Bandit
Bandit
Bandit is the easiest of the wargames available on overthewire.org, and is meant for beginners. In this walkthrough, I will present my solutions to Bandit.
Level 0
Task
The goal of this level is for you to log into the game using SSH. The host to which you need to connect is bandit.labs.overthewire.org, on port 2220. The username is bandit0 and the password is bandit0. Once logged in, go to the Level 1 page to find out how to beat Level 1.
Solution
This one is simple. Connect to the server hosting the wargame via SSH.
ssh bandit.labs.overthewire.org -p 2220 -l bandit0 with bandit0 as the password.
bandit.labs.overthewire.org is the hostname of the wargame server. -p 2220 denotes that we are connecting to port 2220 of the server. -l bandit0 is the user we are logging in as. Using the -l flag at the end of the command makes it easier to switch to the next bandit user. All you have to do is hit the up-arrow, backspace (once or twice), and then type the new number. This is much easier than having to edit ssh bandit0@bandit.labs.overthewire.org -p 2220.
Level 0 -> Level 1
Task
The password for the next level is stored in a file called readme located in the home directory. Use this password to log into bandit1 using SSH. Whenever you find a password for a level, use SSH (on port 2220) to log into that level and continue the game.
Solution
Level 1 -> Level 2
Task
The password for the next level is stored in a file called - located in the home directory
Solution
The reason that the cat - didn’t work is because - is a symbol. Another solution is to run cat < -, which utilizes IO redirection to pass the - string to the cat command
Level 2 -> Level 3
Task
The password for the next level is stored in a file called spaces in this filename located in the home directory
Solution
The first solution: cat spaces\ in\ this\ filename uses \ to escape the space so that the bash interprets the space character properly
If your shell supports the use of quotations "", then you can enclose the filename in space as seen in the solution: cat "name with spaces", otherwise you need to use an escape sequence: cat name\ with\ spaces
Level 3 -> Level 4
Task
The password for the next level is stored in a hidden file in the **inhere** directory.
Solution
After running ls in ~/inhere, we see that there are not files… but there actually is a file. Some files can be “hidden” if their name is preceded with a .: e.g., .gitignore
There is a flag we can specify for ls to display all files, including those that are hidden. Open the man page with man ls, and search for -a with /-a and hit enter. In order to navigate the man page comfortably, you will need to know some vi/vim motions and key bindings. But the most important thing is to know is how to navigate a man page.
Solution: ls -a, cat ...Hiding-From-You
Level 4 -> Level 5
Task
The password for the next level is stored in the only human-readable file in the inhere directory. Tip: if your terminal is messed up, try the 'reset' command.
Solution
The password is in the only human-readable file. The file command is perfect for this, as it is meant to give information about files, such as their classification: human-readable text, ELF, executable, JSON, etc…
We then see that there is only one file that is “human-readable”, and that is the one with ASCII text. Now we can simply print the contents of the file to reveal the password for level 5
Level 5 -> Level 6
Task
The password for the next level is stored in a file somewhere under the **inhere** directory and has all of the following properties:
We also have the following hints:
- human-readable
- 1033 bytes in size
- not executable
Solution
Right off the bat, we can see that there are three important qualities about the password file that will help narrow down our search. This time, we will utilize the find command with necessary flags to use what we know from the problem statement:
find ./ -type f -size 1033c ! -executable
Here is a quick breakdown of this command:
./specifies that we want to search through the current working directory. By default,findwill search recursively, which means that it will search through all files and sub-directories-type fsays that we are searching for a regular file. i.e., a human readable file-size 1033csays that we are searching for a file that is 1033 bytes length. this is non-intuitive, but consulting themanpage for find,man find, reveals this to be true! -executablesimply states that the file is not executable. In most programming languages, includingbash,!is equivalent to a logical negation, which inverts the truth value of whatever is in front of it
Sidenote: bash is both a command-line interpreter and a Turing complete programming language
A slight more advanced solution that achieves the same result is: find ./ -type f -size 1033c ! -executable | xargs cat
Level 6 -> Level 7
Task
`The password for the next level is stored somewhere on the server and has all of the following properties:
Hints:
- owned by user bandit7
- owned by group bandit6
- 33 bytes in size
Solution
Similar approach as last time. Make sure to search through man find to see what flags you need. Another key piece of information that the password is “somewhere on the server”. This tells us that we need to search from the root directory
Here is a link that will break down the solution: https://explainshell.com/explain?cmd=find+%2F+-group+bandit6+-user+bandit7+-size+33c+2%3E%2Fdev%2Fnull+%7C+xargs+cat
find / -group bandit6 -user bandit7 -size 33c 2>/dev/null | xargs cat
Level 7 -> Level 8
Task
The password for the next level is stored in the file data.txt next to the word millionth
Solution
For this problem, you need to utilize the grep command. grep is used to search files for string patterns. “strings” are sequences of characters, like the letters of an alphabet, numbers, or other special characters. The point is that grep can be used to look for the string pattern millionth.
Level 8 -> Level 9
Task
The password for the next level is stored in the file data.txt and is the only line of text that occurs only once
Solution
This one is a little different, but completely changes the approach we take. We are looking for a line of text that only occurs once, and we don’t even know what to grep for, which means we will need to use some new commands. We will use uniq and sort.
For a good overview of what the solution does, please put the solution here: https://explainshell.com/
sort data.txt | uniq -u
Level 9 -> Level 10
Task
The password for the next level is stored in the file data.txt in one of the few human-readable strings, preceded by several '=' characters.
Solution
This one is relatively straightforward. grep for a line of text that has several = characters. There is probably a more elegant solution out there, but here is my solution. One other thing to note is that the data.txt file contains binary data, which means you can’t directly use grep on it. Luckily there is the strings command, which, by default, searches for a sequence of 10 human-readable characters on a line and prints it out, otherwise ignoring the line. We can then redirect this output with the | operator.
Level 10 -> Level 11
Task
The password for the next level is stored in the file **data.txt**, which contains base64 encoded data
Solution
data.txt contains base 64 encoded data. Remember, encoding is not encryption, so you are not decrypting anything here, just decoding. I have two solutions:
base64 -d < data.txt- utilizes IO redirection
cat data.txt | base64 -d- admittedly, an unnecessary use of cat
Level 11 -> Level 12
Task
The password for the next level is stored in the file data.txt, where all lowercase (a-z) and uppercase (A-Z) letters have been rotated by 13 positions
Solution
This one is quite interesting. This is a ROT13 Cipher. We can use the tr command to map one set of characters to another set of characters. We are going to define in such a way that A maps to N, B maps to O, and so on. Highly recommend reviewing the wikipedia page I linked to understand more about ROT13.
tr A-Za-z N-ZA-Mn-za-m < data.txt
Level 12 -> Level 13
Task
The password for the next level is stored in the file data.txt, which is a hexdump of a file that has been repeatedly compressed. For this level it may be useful to create a directory under /tmp in which you can work. Use mkdir with a hard to guess directory name. Or better, use the command "mktemp -d". Then copy the datafile using cp, and rename it using mv (read the manpages!)
Solution
This one is a bit annoying, but is useful to know how to do if you find yourself working with zip files or archives a lot. This level teaches you how to use xxd, tar, bzip2, gzip, and gunzip
Level 13 -> Level 14
Task
The password for the next level is stored in /etc/bandit_pass/bandit14 and can only be read by user bandit14. For this level, you don’t get the next password, but you get a private SSH key that can be used to log into the next level. Note: localhost is a hostname that refers to the machine you are working on
Solution
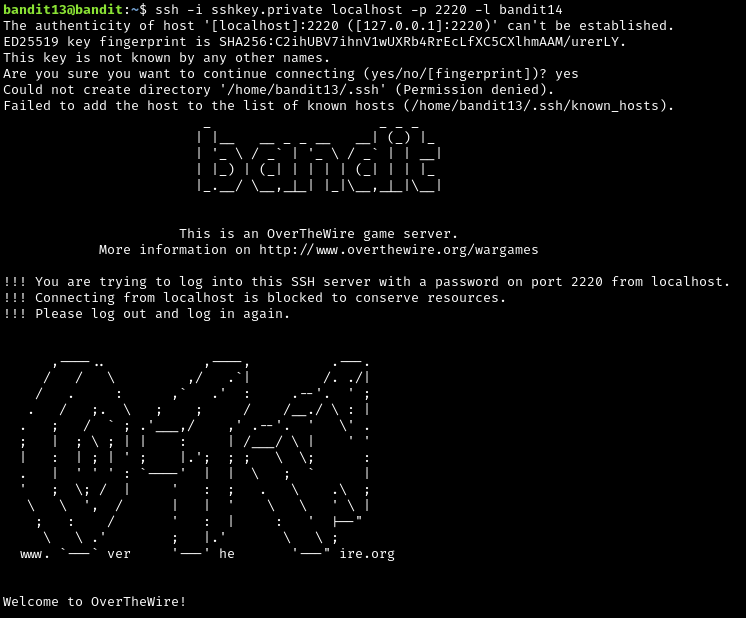
nmap localhost shows that there is a bunch of stuff running on this server. Given that the bandit wargame is being served through port 2220, I decided to use the ssh private key to log in to the next user: ssh -i sshkey.private localhost -p 2220 -l bandit14. Once logged in, simply print out the password with cat. Make sure to exit bandit14, and stay in the bandit13 SSH session for the next level.
Level 14 -> Level 15
Task
The password for the next level can be retrieved by submitting the password of the current level to port 30000 on localhost.
Solution
For this level, we need to find a way to send the password to port 30000 on localhost. This can easily be done with echo and nc (netcat).
echo "<password>" | nc localhost 30000
This should return the password for the next level.
Level 15 -> Level 16
Task
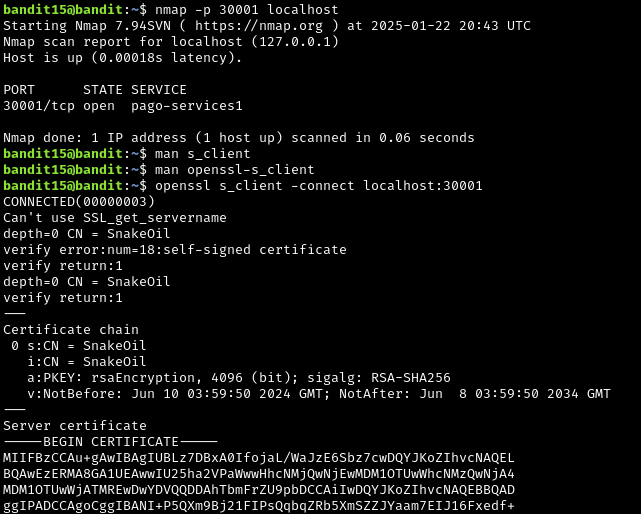
`The password for the next level can be retrieved by submitting the password of the current level to port 30001 on localhost using SSL/TLS encryption.
Helpful note: Getting “DONE”, “RENEGOTIATING” or “KEYUPDATE”? Read the “CONNECTED COMMANDS” section in the manpage.
Solution
Make sure to go through the resources provided on the official bandit wargames page for this level. There is really helpful content in there that help you solve this level.
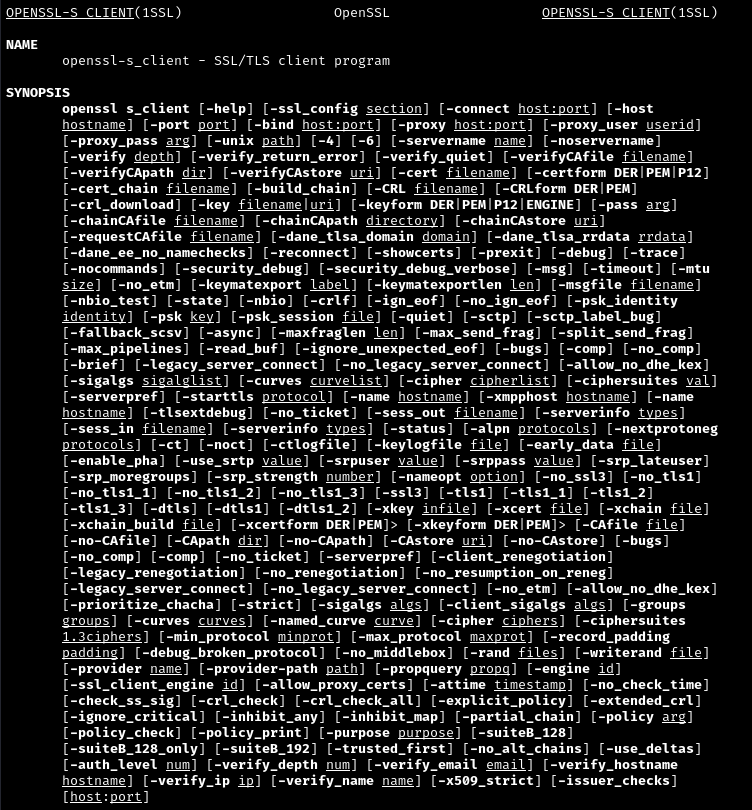
Moreover, make sure to review the man page for openssl
There are other commands that can be used with openssl that seem to be part of the openssl library. For example, in this level you will need to use openssl s_client ... to proceed.
There is man openssl, and there are other more specific manuals for the various subcommands you can use: man openssl-s_client is what we are interested in.
There is a flag here that is pretty important: -connect host:port
Copy and paste the password from the previous level into the prompt, and hit enter. You should then receive the password for the next level.
Level 16 -> Level 17
Task
The credentials for the next level can be retrieved by submitting the password of the current level to a port on localhost in the range 31000 to 32000. First find out which of these ports have a server listening on them. Then find out which of those speak SSL/TLS and which don’t. There is only 1 server that will give the next credentials, the others will simply send back to you whatever you send to it.
Helpful note: Getting “DONE”, “RENEGOTIATING” or “KEYUPDATE”? Read the “CONNECTED COMMANDS” section in the manpage.
Solution
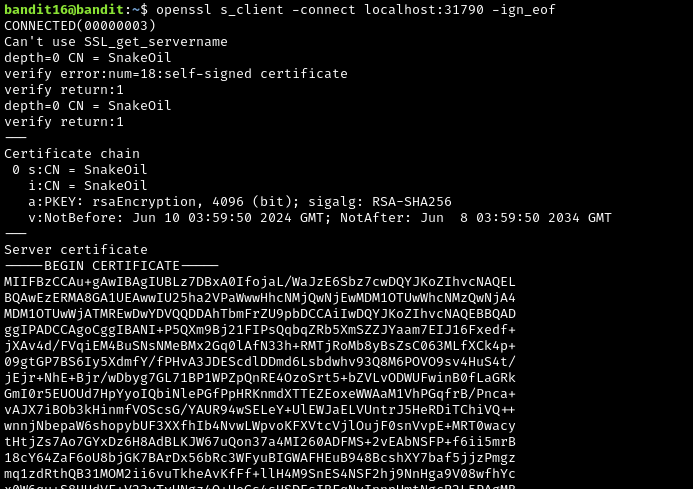
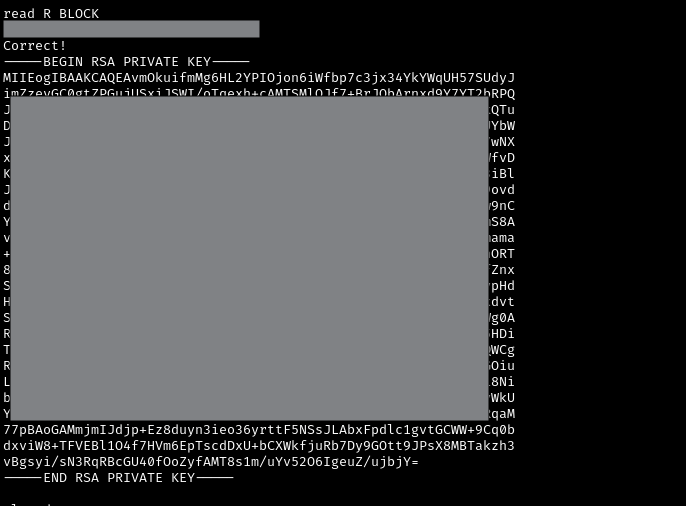
This level was really annoying, but educational. So once you find the server that actually gives you the credentials, you need to tac on another flag to your command. After some digging around on the provided resources, I found this flag: -ign_eof. “ignore end of file”. Rather than providing a password, you will be given a RSA private key. Copy and paste the contents of the private key, beginning from ----BEGIN RSA PRIVATE KEY---- all the way to ----END RSA PRIVATE KEY----, and save it to a file on your local machine. You will need it to log into the next level.
Once you save it to a file, make sure to adjust the access permissions: chmod 400 <privkeyfile>
Further explanation: https://stackoverflow.com/questions/9270734/ssh-permissions-are-too-open
Level 17 -> Level 18
Task
There are 2 files in the homedirectory: passwords.old and passwords.new. The password for the next level is in passwords.new and is the only line that has been changed between passwords.old and passwords.new
NOTE: if you have solved this level and see ‘Byebye!’ when trying to log into bandit18, this is related to the next level, bandit19
Solution
There are two lines of text seen in the output. The first line is the password you need. I think it depends on how you orient the files you use in the command. But try both to see which one works.
Level 18 -> Level 19
Task
The password for the next level is stored in a file readme in the homedirectory. Unfortunately, someone has modified .bashrc to log you out when you log in with SSH.
Solution
We can see that as soon as you try to login, you are kicked out. Upon parsing man ssh, there is a flag that can be used to execute commands as soon as you login. -x.
ssh ... -x "cat ~/readme"
Level 19 -> Level 20
Task
To gain access to the next level, you should use the setuid binary in the homedirectory. Execute it without arguments to find out how to use it. The password for this level can be found in the usual place (/etc/bandit_pass), after you have used the setuid binary.
Solution
This challenge requires you to use a provided binary. ./bandit20-do is basically like a SUID binary made by bandit20. The example they provide is also a bit of a red herring. You do not need the UID (user ID) of bandit20 or for bandit19 for this binary to work. All you have to do is type your command after the binary.
Level 20 -> Level 21
Task
There is a setuid binary in the homedirectory that does the following: it makes a connection to localhost on the port you specify as a commandline argument. It then reads a line of text from the connection and compares it to the password in the previous level (bandit20). If the password is correct, it will transmit the password for the next level (bandit21).
Solution
This one is pretty interesting. You have to establish a TCP listener with netcat, and then connect to it with the provided binary. The port you pick must not be in use by the server, so I opted for something in the upper range of port numbers because it would not likely be used.
fg %1 will bring the first job placed in the background to the foreground. We need to do this so that we can send the password from the previous level to the “other side” of the connection, which is the provided binary. It most likely takes the data you send it (the password), and then does backend processing to check if the password is actually from the previous level, and if the password matches it will send the password for the new level. It is pretty cool that this is automated with a script or something similar. Interesting stuff.
Level 21 -> Level 22
Task
A program is running automatically at regular intervals from cron, the time-based job scheduler. Look in /etc/cron.d/ for the configuration and see what command is being executed.
Solution
There is a trail to follow here. Find the cron jobs in the /etc/cron.d, and identify the script relevant to this level. In this case, it is cronjob_bandit22.
Print out the contents of the cron job, copy and paste the path to the shell script (.sh), print that out with cat, and then keep reading what the script is doing, and try to print out the file in the
Level 22 -> Level 23
Task
A program is running automatically at regular intervals from cron, the time-based job scheduler. Look in /etc/cron.d/ for the configuration and see what command is being executed.
NOTE: Looking at shell scripts written by other people is a very useful skill. The script for this level is intentionally made easy to read. If you are having problems understanding what it does, try executing it to see the debug information it prints.
Solution
Similar to the previous level, you need to observe what is going in the cronjobs, but specifically for bandit23. Print it out, and you will see that there is a shell script that it is executing. Print out the contents of the shell script, and you will see a couple of interesting things:
myname=$(whoami)is utilizing command substitution,$(whoami), and stores the output of that command into a variable,myname, for later use. The point of this is make the script more efficient. Rather than runningwhoamievery time you need your username, you can just run it once and store it in a variable.mytarget=$(echo I am user $myname | md5sum | cut -d ' ' -f 1)does several things- Since
bandit23probably made this script, we assume that the value of$mynameisbandit23. echo "I am user $myname"is then piped intomd5sum, which computes the md5 hash of the stringI am user bandit23- This is then piped to the
cutcommand, which simply cuts up text pipelines to another format. In this case, we are splitting the contents of the piped text by a single whitespace,' ', and then taking the first element of the split up contents. In this case, this is the md5 hash
- Since
- It then writes the password to a directory called
/tmp/<md5hash>, where<md5hash>is the previously computed md5 hash ofI am user bandit23
We can then print out the contents of this directory to reveal the password for the next level.
Level 23 -> Level 24
Task
A program is running automatically at regular intervals from cron, the time-based job scheduler. Look in /etc/cron.d/ for the configuration and see what command is being executed.
NOTE: This level requires you to create your own first shell-script. This is a very big step and you should be proud of yourself when you beat this level!
NOTE 2: Keep in mind that your shell script is removed once executed, so you may want to keep a copy around…
Solution
This one was pretty interesting. You need write your own shell script to obtain the password for the next level. My solution was to set up a netcat listener, and have my script write the contents of /etc/bandit_pass/bandit24 through a TCP connection via netcat
Here is my one-liner solution: echo -e '#!/bin/bash\ncat /etc/bandit_pass/bandit24 | nc localhost 48484' > script.sh; chmod +x script.sh; stat --format "%U" script.sh; nc -nlvp 48484;
Once you run this, you just have to wait for the password to appear.
Level 24 -> Level 25
Task
A daemon is listening on port 30002 and will give you the password for bandit25 if given the password for bandit24 and a secret numeric 4-digit pincode. There is no way to retrieve the pincode except by going through all of the 10000 combinations, called brute-forcing.
You do not need to create new connections each time
Solution
My approach to this was to create a file with all of the input I would need, and then use IO redirection to use that file as input to a netcat connection to the listening daemon on port 30002.
``
Level 25 -> Level 26
Task
Logging in to bandit26 from bandit25 should be fairly easy… The shell for user bandit26 is not /bin/bash, but something else. Find out what it is, how it works and how to break out of it.
NOTE: if you’re a Windows user and typically use Powershell to ssh into bandit: Powershell is known to cause issues with the intended solution to this level. You should use command prompt instead.
Solution
This level was honestly pretty difficult for me, but was definitely an interesting learning experience.
There are a couple of steps needed to solve this level.
- Log in to bandit25
- Log in to bandit26 with private key via SSH
- Ensure that the
morecommand is invoked inbandit26’s “shell” - Enter
vito invoke a shell - Grab the password for
bandit26with the provided binary
Here is how I did it:
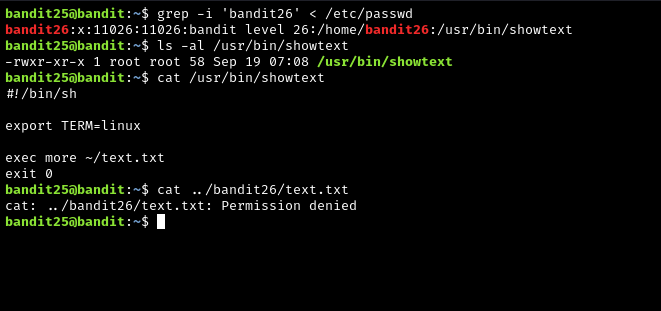
For a while I did some digging around in the man pages of all of the commands recommended for this level: ssh, more, vi, etc… But none of them seemed to contain exactly what I needed for identifying the type of shell bandit26 had. Then I remembered: /etc/passwd. It is possible to define the default shell of a user or service account using the passwd file. So then I ran grep 'bandit26' < /etc/passwd and there it was. bandit26 did not have /bin/bash as the their shell, just like the hint to this problem said.
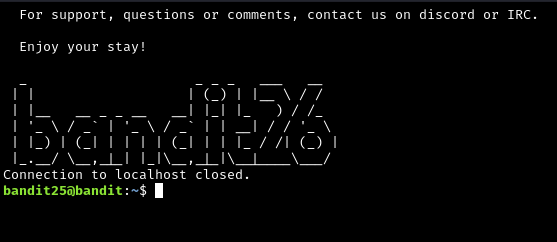
At this point, I tried running cat /usr/bin/showtext and to my surprise this actually worked. I could see that there were only one real command in this file: exec more ~/text.txt. And then it hit me, the giant SSH banner I was seeing may have not actually been the SSH banner, but the contents of a text file in bandit26’s home directory.
But what did this mean? My first instinct was to see if I could edit /usr/bin/showtext, but this did not work due to insufficient privileges. Then I remembered from the man page for more that I could enter vi by pressing “v” while in the more command output. But then I got stuck again.
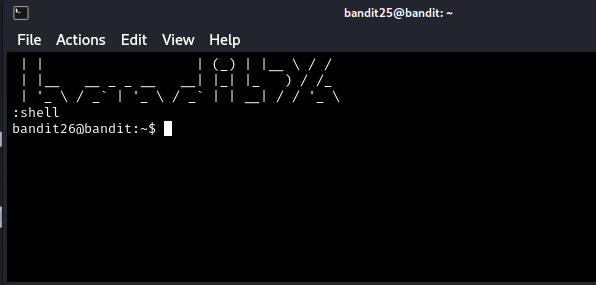
I then decided to do more research online about starting a shell in vi since the man page didn’t really say anything about this. :set was what ended up helping me beat this level. Once in vi, you need to type and enter :set shell=/bin/bash to set the shell vi can interact with. Once this is done, you can invoke this shell with :shell.
This should create a shell session as bandit26, where you can run a binary conveniently sitting in the user’s hone directory. You use this binary to run commands as bandit27, which means you can simply read the password for level 27.
Level 25 was honestly pretty tough. Personally, I think that it is a big step up in difficult compared to Level 24.
ssh -i bandit26.sshkey -p 2220 localhost -l bandit26
Level 26 -> Level 27
Task
Good job getting a shell! Now hurry and grab the password for bandit27!
Solution
At this point, you should have obtained a shell on user bandit26. See the image below for obtaining the password for bandit27.
Level 27 -> Level 28
Task
There is a git repository at ssh://bandit27-git@localhost/home/bandit27-git/repo via the port 2220. The password for the user bandit27-git is the same as for the user bandit27.
Clone the repository and find the password for the next level.
Solution
This level is pretty straightforward: clone the specified git repository, and search for the flag. The first step is to familiarize yourself with git, here is an excellent resource to do so, and some documentation. Remember, git is NOT the same thing as github.
Just to be safe, I ran mktemp -d and cd‘d into that directory before cloning the repo.
git clone ssh://bandit27-git@localhost:2220/home/bandit27-git/repo repo
Level 28 -> Level 29
Task
There is a git repository at ssh://bandit28-git@localhost/home/bandit28-git/repo via the port 2220. The password for the user bandit28-git is the same as for the user bandit28.
Clone the repository and find the password for the next level.
Solution
This one is pretty interesting. I cloned the repo as before, but was not completely surprised to see that the password was not just sitting in the readme file as before. In order to view the git commit history, I used the git log command:
git --no-pager log --oneline --graph
--no-pagerensures that the output of the command is not displayed one “screenful” at a time. Think about how themorecommand displays output that is greater than a single screenful. I am specifically trying to avoid that here. This is not necessary to completing the challenge, just a personal preference--one-linewill display one commit per line in the terminal, including thecommit hashand thecommit message--graphdoesn’t do anything here, but that is only because there weren’t any branches. if there were, the output would be easier to understand
At this point, I saw that there were only three commits, and after reading all of the commit messages, one really stood out to me: add missing data.
“add missing data”. Interesting. This is when I decided to print out the contents of this file when it was in this state: git show 3621de8:README.md
The reason this works is because of the object system in git. Commits are one of the many git objects, and when a commit is made, and compressed version of that file is stored in the .git/ directory. Once I ran the command above, git was able to identify the specific state of the README.md file that I was interested based off of the seven-character hash I provided.
- That is another interesting thing about
git, is used (the file + author information + date of commit) to compute the MD5 hash of the commit in order to later uniquely identify it.
Level 29 -> Level 30
Task
There is a git repository at ssh://bandit29-git@localhost/home/bandit29-git/repo via the port 2220. The password for the user bandit29-git is the same as for the user bandit29.
Clone the repository and find the password for the next level.
Solution
This one was also cool. Downloading the repository is the same as the previous two levels. One thing to note regarding my solution is that git switch and git branch do the same thing, but git switch is meant to supersede git branch. I only used both to test my knowledge.
There is a pretty big hint in README.md: no passwords in production!. This is important because sometimes developers can make mistakes, or just be outright lazy. I switched to the dev branch and was able to see the password sitting in that version of README.md. Pretty straightforward.
Level 30 -> Level 31
Task
There is a git repository at ssh://bandit30-git@localhost/home/bandit30-git/repo via the port 2220. The password for the user bandit30-git is the same as for the user bandit30.
Clone the repository and find the password for the next level.
Solution
This one was a little harder. After giving this one a try for a while, I decided to take a break. Searching the .git folder didn’t provide any leads. After working on another project for a while and researching git, I was reminded about the existence of git tag. tag are usually used to “tag” a point in the git commit history. It is kind of like putting a bookmark on a specific page in a book, but with the option of having several bookmarks in the book at once. A git commit is like a page in a book (the repository). Trying git tag showed something new: secret. In order to see the contents of the tagged commit, I used git show secret.
- Heuristics
- A git commit is to a page that a tag is to a bookmark.
- COMMIT:TAG:PAGE:BOOKMARK
- COMMIT:REPO:PAGE:BOOK
- A git commit is to a page that a tag is to a bookmark.
Level 31 -> Level 32
Task
There is a git repository at ssh://bandit31-git@localhost/home/bandit31-git/repo via the port 2220. The password for the user bandit31-git is the same as for the user bandit31.
Clone the repository and find the password for the next level.
Solution
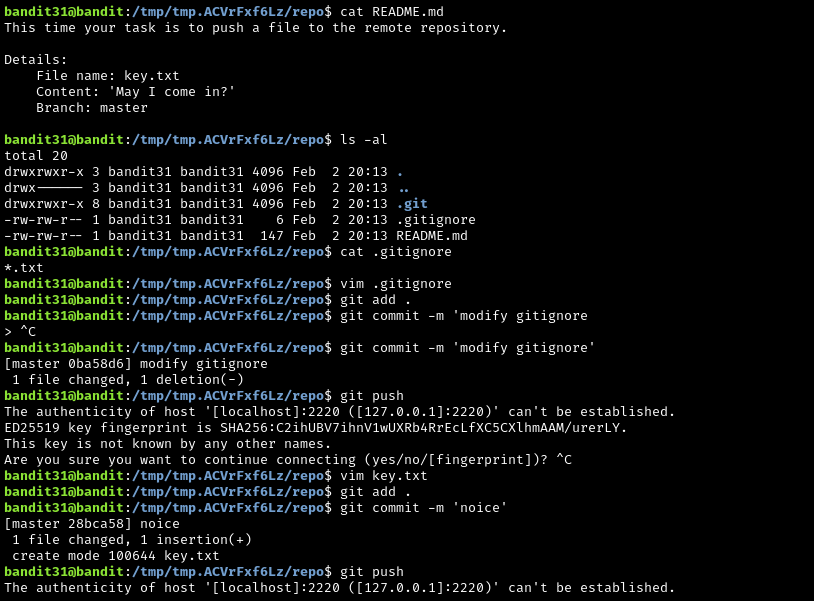
Honestly, this level was pretty easy. Although, I did attempt to beat this with the wrong approach for about 5 minutes before realizing what else I could do.
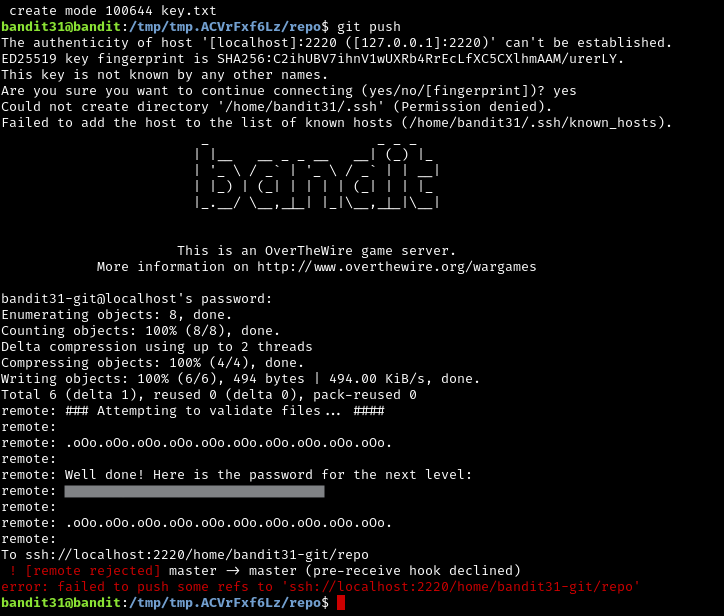
At first I tried modifying the .gitignore file so that I could push that change, and then pull from the remote repository. But that just wouldn’t work. After this, I decided to try making a file, key.txt, and adding May I come in? to key.txt. Funny enough, the password to the next level is embedded in a response from the remote host’s git repository, and not actually given to you in a file.
Level 32 -> Level 33
Task
After all this git stuff, it’s time for another escape. Good luck!
Solution
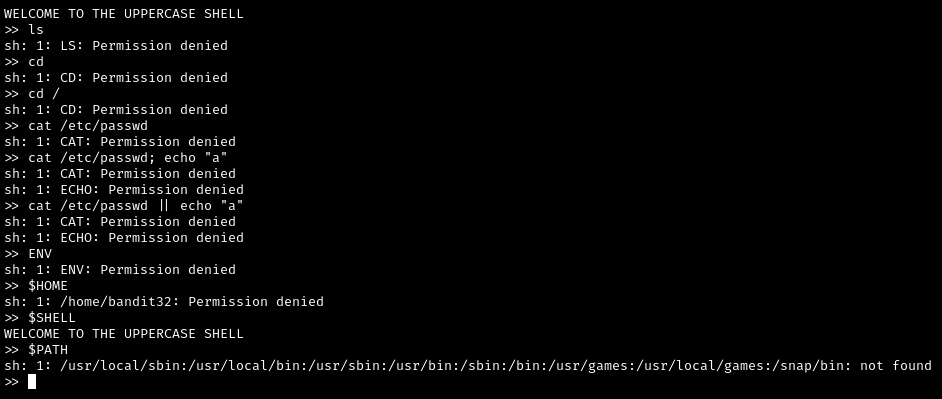
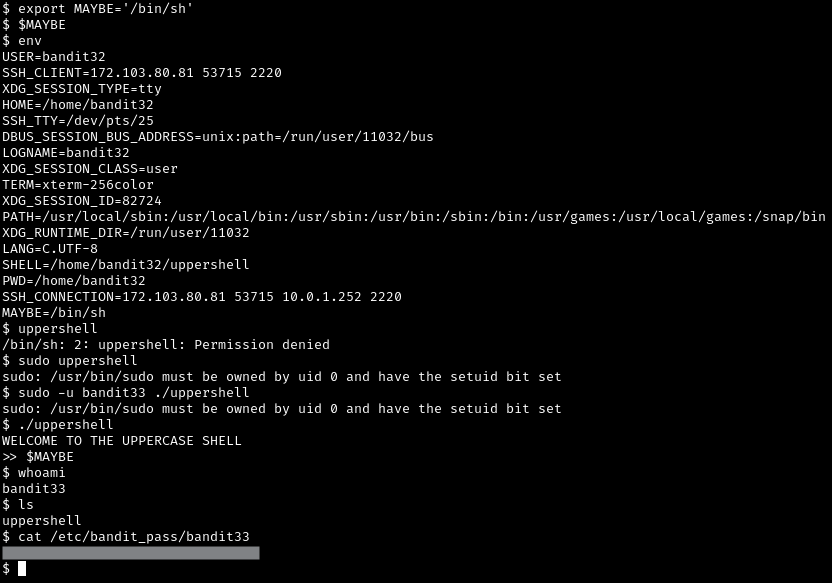
At first I was a little confused about what kind of approach to take, but after running a few commands, I eventually tried env. Normally this will send all of the environment variables for the current user to the standard output (the console), but that didn’t work this time. Another thing, everything you type in this shell is converted to uppercase, so standard shell commands are not going to work. Then it occurred to me that environment variable names are typically uppercase, so then I entered $HOME and I got some real output.
At this point, I my approach was to enumerate the environment variables. I then referred to man sh, where I then entered /environment variable to narrow my search. Eventually something called environ appears at the bottom, which I then explored further with man environ.
Up to this point, a lot of what I read did not directly help with solving this level. However, after testing more and more possible environment variable names, I realized that the error messages didn’t look like your typical error message. There are usually three sections of an error message: the command, what happened, and where. These error messages had four sections. I wasn’t too sure what they were, but one thing that is pretty obvious from the start is that your command is converted to uppercase and consistently seen in the 3rd position of the string, where “:” is the delimiter.
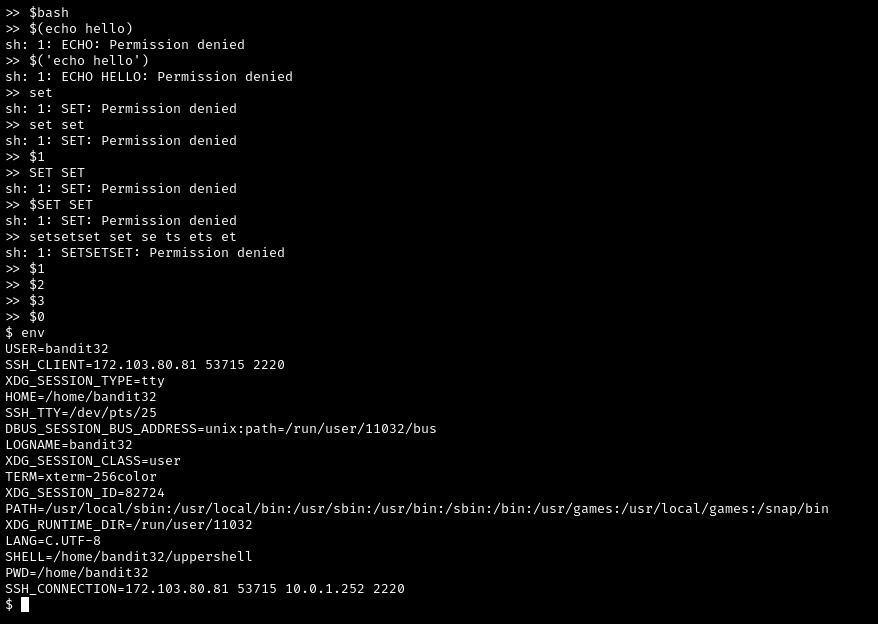
At this point, it finally clicked. I need to use positional arguments. But how? I had no idea. Looking at the “error messages” a little more, I noticed that sh was always in the first position. Could running $0 give me a shell? It actually did.
Finally. We are getting somewhere. My immediate instinct was to alter the the $SHELL variable to /bin/sh, but first I checked to see if bandit33 owned /home/bandit32/uppershell. And of course, it is owned by bandit33. At this point I was thinking that I needed to just create an environment variable, and use it while the ./uppershell is running.
And it worked. I then printed out bandit33’s password, and moved on the next level.
Level 33 -> Level 34
At this moment, level 34 does not exist yet.
It was bittersweet getting to the end of the bandit wargames. I learned a lot in the process of solving these, and I hope that my writeup has been helpful. Definitely gives these games a try if you haven’t. The solutions presented here are not the only ways to win.


